Preface
Greetings everyone. We have been working on some exciting performance enhancements and wanted to share them with the community and solicit feedback. I hope you have as much fun with this as I have had! Before we commit this to our documentation we’d like to get your feedback and questions.
-Dominick
Storj DCS Performance
Overview
Performance Basics
In decentralized storage, the concept of parallelism has a huge effect on performance. As you will read below we can enact parallel efforts at several layers to ensure the highest possible performance. This performance capability is made possible by our distributed nature, allowing you to retrieve your data from potentially hundreds or thousands of nodes with a speed limit gated only by your local compute or network resources.
Data Basics
Files → Segments → Pieces
- Files
- Files are the items you upload to the network. Files are broken down into segments.
- Files are represented by the green box in the diagram below.
- Segments
- Files are made of one or more segments. Our segment size is 64MB. A 256MB is made up of 4 such 64MB segments.
- Segments are represented by the blue box in the diagram below.
- Pieces
- Segments are made up of pieces. For each segment sent out to the network 80 pieces are distributed to the nodes.
- Pieces are represented by the red box in the diagram below.

Parallelism
A theme that will come up time and time again when we talk about performance is parallelism. In this guide parallelism and concurrency are used as like terms. We will talk about the concept of base parallelism and our new segment parallelism enabling new record speeds.
Base Parallelism
When you upload or download from the network, file segments are sent one after another. However, the pieces that make the segments are sent in parallel. Much effort has gone into optimizing this process, for instance when you download a file we attempt to grab 39 pieces when only 29 are required eliminating slow nodes (Long Tail Elimination). This is our base parallelism and allows up to 10 nodes to respond slowly without affecting your download speeds.
When uploading we start with sending 110 erasure-coded pieces per segment in parallel out to the world but stop at 80. This has the same effect as above in eliminating slow nodes (Long Tail Elimination).
Both examples above are our base parallelism that occurs within segments.
Segment Parallelism
In addition to the base parallelism, we now have the capability of transferring multiple segments in parallel which we refer to as segment parallelism. Let’s look at an example for a 512MB file.
A 512MB File is made up of 8 64MB Segments (512/64=8). When downloading a File we use the fastest 29 Pieces. So a 512MB file is 8x 64MB Segments of which you will retrieve a total of 232 Pieces (8*29=232). To download this as fast as possible you would request each Segment at the same time, in parallel which results in you downloading all 232 Pieces at the same time. This means in theory you can download your file 8x faster than if you requested each segment serially.
What about if the file was 1GB? In the case using the math above you could request up to 16 Segments in parallel for peak performance, that is if your computer and network support the increased laid which we explore deeper in this article.
Example
You have a 1GB file you wish to upload to the network. Given that the block size for files on the Storj DCS network is 64MB, your upload will contain 16 such blocks (1024/64=16). Thus forth we will refer to these 64MB blocks as segments.
Given that you have 16 segments to upload you can just do it all at once, that is if you have enough bandwidth and memory. Sending multiple segments at a time will be covered in detail below and is the key to realizing incredible speeds on the Storj DCS network.
Please note that parallelism as demonstrated above is ideal for a small number of large files, 64MB and above. If you wish to move a large number of smaller files follow our specific guidelines below that focuses on concurrent file transfer vs concurrent segment transfer.
Integration Methods
There are a few methods independent of the client tools used to interact with the Storj DCS network.
- Native (Fastest for downloading large files)
- You encrypt, erasure code, and transfer from the nodes directly from your computer. This is ideal for downloading large files fast.
- Supports parallelism for downloads
- Has a 2.68x upload multiplier for uploads and does not support segment parallelism
- You encrypt, erasure code, and transfer from the nodes directly from your computer. This is ideal for downloading large files fast.
- Gateway MT (Fastest for uploading large files)
- Encryption, erasure coding, and upload to nodes occur serverside
- Supports parallelism for upload and multi transfer for download
- 1GB upload will result in 1GB of data being uploaded to storage nodes across the network
- Based on S3 standard
- Encryption, erasure coding, and upload to nodes occur serverside
- HTTP (Alternative for downloading)
- Encryption, erasure coding, and upload to nodes occur serverside
- An alternative that allows download parallelism for large files
- Not as fast as Gateway MT but faster than no parallelism
- Encryption, erasure coding, and upload to nodes occur serverside
Tools
We refer to the components used to interact with the network as our “Uplink” peer class.

There are several tools that may be used to interact with the Storj DCS network. RCLONE is the only one of them that supports both the Gateway MT and Native methods listed above. We will define each tool below and then guide you in deciding your best path in the tuning guides below.
RCLONE
Rclone is a command-line program to manage files on cloud storage. It is a feature-rich alternative to cloud vendors’ web storage interfaces. When not using our Native Uplink RCLONE is our go-to tool. In RCLONE parallelism is referred to as concurrency. The default concurrency for RCLONE while uploading multipart files is 4.
Uplink CLI
The Uplink CLI is our client-side application that supports interacting with the Storj DCS network. This tool supports parallelism for downloads only.
HTTP
The Storj DCS service allows you to host static objects along with other web-delivered assets such as streaming multimedia and large file distribution.
Tuning
Goals
The goal of the following tuning is to get the best overall total throughput for your data transfer session.
Upload - Choose your own adventure
Let’s start with what your needs are with a focus on the goal of best overall throughput. You likely fall somewhere in the gradient listed below.
- I want to upload a single to a few large files
- I want to upload many smaller files
Given that we get great performance with parallel actions we need to calculate how to get the most out of what you have. We will list a few examples below. Please note these examples focus on the maximum possible performance and can require significant memory resources. We address this in detail in the tuning section.
Single to few huge large files (Upload)
In testing, we find that upload performance can be fully realized with single files as small as 6GB. This means if you have the resources (memory and network) you can realize the best theoretical performance with the following figures.
- 1x 6GB file uploaded with a Chunk Size of 64M and Concurrency of 96
- 2x 3GB files uploaded with a Chunk Size of 64M and Concurrency of 48
- 4x 1.5GB files uploaded with a Chunk Size of 64m and Concurrency of 24
Many smaller files (Upload)
If uploading many files that are 64MB or smaller we don’t have the opportunity to upload multi segments as segments are 64MB and thus we need to transfer many files at the same time to realize the benefits of parallelism.
Review
Reviewing what we just learned above.
- Files 64MB or smaller are a single segment and thus to push the network we need to move a bunch at the same time.
- Large files can benefit from parallel segment transfers
- You can combine concurrent file transfer and segment parallelism for several large files if you have not hit our theoretical limits.
Upload Tuning (Large Files)
Rclone - Gateway MT
When uploading files larger than 64MB the fastest solution is using a tool that supports multipart upload via the S3 standard and our S3 compatible hosted Gateway MT. We advise using RCLONE with our Gateway MT integration pattern to enable multipart uploads and concurrency tuning.
Resources
Upload performance is generally memory bound and uses very little compute as the burden of encryption and erasure coding is handled by the hosted Gateway MT service. Memory requirements are as follows.
- (S3 Upload Concurrency * Chunk Size) * Concurrent File transfers
Simply put memory requirements are equal to the total file size to upload if maximizing throughput. If you want to upload a 2GB file (2048/64=32) and use the ideal figure of 32x S3 Upload Concurrency you will need 2GB of free memory. If you use 16x S3 Upload Concurrency you will only need 1GB of memory. Conversely, if you want to upload 2x files at the same time and use the ideal figure of 32 concurrencies you will need 4GB of memory.
Enormous Files
As a general rule enormous files tend to reach peak transfer speeds of around 16GB of memory usage which works out to S3 Upload Concurrency of 96 and Chunk Size of 64M. We have demonstrated over 1340Mb/s (168MB/s) with such settings and resources.
Example Commands
Prerequisites
Ultimately your compute, ram, or internet connection is likely to be the gating factor. We advise that you perform a speed test to understand the capability of your network before testing.
Single 1GB File
Below you have an optimal command to achieve the best theoretical transfer speed. Higher concurrency or segment size will not help as 1024MB/64MB=16 total segments. The following command uploads all 16 segments in parallel.
rclone copy --progress --s3-upload-concurrency 16 --s3-chunk-size 64M 1gb.zip remote:bucket
Single 10GB File
Below you can see us using three different amounts of memory to achieve up to the best theoretical speed. Ram usage equals concurrency * chunk size and as a rule of thumb, we like concurrency to stay at or under 96. Because of this, we increase chunk size by 64MB steps to improve performance.
Good (Will use 2.5GB of ram to upload)
This will achieve 25% of theoretical max performance but uses much less ram
rclone copy --progress --s3-upload-concurrency 40 --s3-chunk-size 64M 10gb.zip remote:bucket
Better (Will use 5GB of ram to upload)
This will achieve 50% of theoretical max performance but uses less ram
rclone copy --progress --s3-upload-concurrency 40 --s3-chunk-size 128M 10gb.zip remote:bucket
Best (Will use 10GB of ram to upload)
10,240/256=40 this is the max concurrency * chunk size possible for 10GB
rclone copy --progress --s3-upload-concurrency 40 --s3-chunk-size 256M 10gb.zip remote:bucket
Single 100GB File
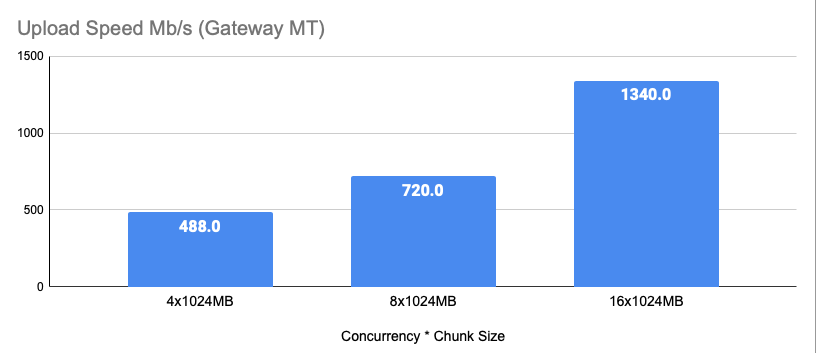
Things get fun with enormous files, fun, fast, and resource-intensive. At these sizes and speeds, we start to run into limitations outside the client configuration. In some instances, your host may limit your performance via tools like Quality of Service (QOS). Below you can see us using three different amounts of memory to achieve up to the best speed. We find as current the best possible performance occurs around 16GB of memory usage where we have observed over 1340Mb/s (168MB/s) inclusive of encryption and erasure coding.
Ram usage equals concurrency * chunk size and as a rule of thumb, we like concurrency to stay at or under 96. Because of this, we increase chunk size to 1024MB to improve performance and greatly reduce the concurrency requirement.
Good (Will use 4GB of ram to upload)
This will achieve >25% of max performance but uses half the ram as our Better settings. We have observed 488Mb/s (61MB/s) with this configuration.
rclone copy --progress --s3-upload-concurrency 4 --s3-chunk-size 1024M 100gb.zip remote:bucket
Better (Will use 8GB of ram to upload)
This will achieve >50% of max performance but uses half the ram as our Best settings. We have observed 720Mb/s (90MB/s) with this configuration.
rclone copy --progress --s3-upload-concurrency 8 --s3-chunk-size 1024M 100gb.zip remote:bucket
Best (Will use 16GB of ram to upload)
Although you can use more concurrency and/or larger chunk sizes we find performance tends to top out above 1200Mb/s (150MB/s) around this level.
rclone copy --progress --s3-upload-concurrency 16 --s3-chunk-size 1024M
100gb.zip remote:bucket
Observed Speeds
Multi 1GB File
As discussed earlier uploading is ram limited so we will explore calculating upload settings featuring the --transfers flag. Really all we do is the same calculation as done for a single 1GB file and then multiply it by the number of files you want to upload simultaneously.
As caculate earlier 1024MB/64MB=16 total segments. A 1GB file is 16 segments with a chunk size of 64MB. Lets go ahead and optimise around 4GB of ram with the assumption enough upstream bandwidth is available .
Working backward 4GB allows us to upload 4 files in parallel while also uploading all 16 segments in each file at the same time. This is equivalent to a 4GB file being uploaded with a concurrency of 64. Avoid total concurrency figures above 96. Let’s look at two commands that will present your system with the same load in different ways.
4x 1GB Files 16 concurrency per file (max)
Transfer 4 is the default in rclone
rclone copy --progress --transfers 4 --s3-upload-concurrency 16 --s3-chunk-size 64M 1gb.zip remote:bucket
8x 1GB Files 8 concurrency per file
Exploring 8x transfers but with 8 concurrency to total concurrency stays at 64. This should have similar performance to the command above. There is no “best” command between the two, the extra examples are intended to offer additional insight into how we get to a total concurrency load.
rclone copy --progress --transfers 8 --s3-upload-concurrency 8 --s3-chunk-size 64M 1gb.zip remote:bucket
Download - Choose your own adventure
Let’s start with what your needs are with a focus on the goal of best overall throughput. You likely fall somewhere in the gradient listed below.
- I want to download a single large file
- I want to download many smaller files
Given that we get great performance with parallel actions we need to calculate how to get the most out of what you have. We will list a few examples below. Please note these examples focus on the maximum possible performance and can require significant compute resources. We address this in detail in the tuning section. Unlike uploads where we exclusively use RCLONE your requirements will steer us to either the Storj Uplink CLI or RCLONE.
Single to few huge large files (Download)
In testing, we find that download performance can be fully realized with single files as small as 1.5GB. This means if you have the resources (memory and network) you can realize the best theoretical performance with the following figures.
- 1x 1.5GB file uploaded with a Chunk Size of 64M and Concurrency of 24 using UPLINK CLI
Many smaller files (Download)
If downloading many files that are 64MB or smaller we don’t have the opportunity to use the uplink parallelism feature as each file is only made up of a single segment. In this case, it is faster to use RCLONE to retrieve our files. RCLONE supports --transfers allowing us to realize parallelism of smaller files by grabbing many files at the same time. Uplink will support this in the future.
Review
Reviewing what we just learned above.
- Files 64MB or smaller are a single segment and thus to push the network we need to move a bunch at the same time.
- Large files can benefit from parallel segment transfers
- You will use Uplink CLI for large files and RCLONE for Small files
Download Tuning (Large Files)
UplinkCLI - Native
Native uplink is the best choice for large files as it bypasses our edge service layer and connects you directly to the nodes. This results in the best possible throughput. If downloading several large files it is commonly faster to enact the parallelism per file yet download the many files in a serial fashion one after the other.
Resources
Download performance is CPU bound as the burden of encryption and erasure coding is handled by the client machine running Libuplink. Compute requirements are as follows.
- One CPU (not thread) per concurrent operation.
Simply put if you have a 4 core CPU presenting 8 threads via hyperthreading you will hit near peak performance with a parallelism setting of 4. You can use higher figures up to 50% over core count to marginally increase performance. On a 24 core server, we found great performance at --parallelism 24 with an increase of performance of 4.5% when set to --parallelism 32.
Enormous Files
Use as many cores as you can. Using --parallelism 24 (24c) we have observed speeds of over 2600Mb/s (325MB/s) with supportive compute and networks. This requires multi GB IP Transit.
Example Commands
Prerequisites
Ultimately your compute, ram, or internet connection is likely to be the gating factor. We advise that you perform a speed test to understand the capability of your network before testing.
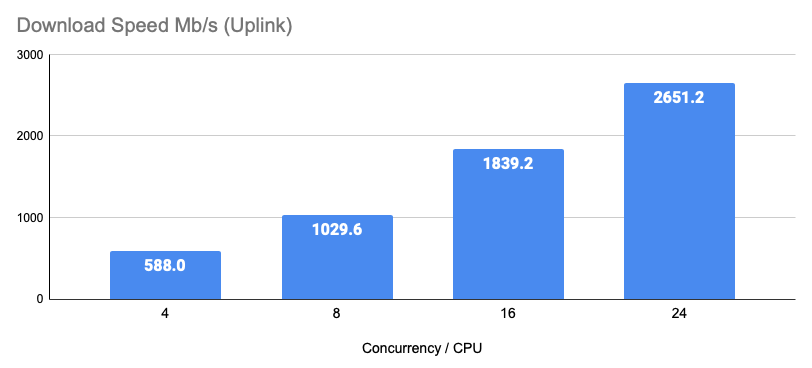
Good (Will use 4 CPU Cores)
These settings on a test 100GB file with adequate compute and a supporting network connection resulted in an observed transfer speed of 596Mb/s (74.5MB/s).
uplink cp sj:/bucket/bighugefile.zip ~/Downloads/bighugefile.zip --parallelism 4
Better (Will use 8 CPU Cores)
These settings on a test 100GB file with adequate compute and a supporting network connection resulted in an observed transfer speed of 1839.2Mb/s (229.9MB/s).
uplink cp sj:/bucket/bighugefile.zip ~/Downloads/bighugefile.zip --parallelism 8
Best (Will use 24 CPU Cores)
These settings on a test 100GB file with adequate compute and a supporting network connection resulted in an observed transfer speed of 2651.2Mb/s (331.4MB/s).
uplink cp sj:/bucket/bighugefile.zip ~/Downloads/bighugefile.zip --parallelism 24
More is not always better (Will use 24 CPU Cores)
These settings on a test 100GB file with adequate compute and a supporting network connection resulted in an observed transfer speed of 2676Mb/s (334.5MB/s). This results in speeds that are 1% better but completely saturate the servers compute showing there is not much advantage at this scale to exceeding available CPU Cores.
uplink cp sj:/bucket/bighugefile.zip ~/Downloads/bighugefile.zip --parallelism 32
Observed Speeds
Download Tuning - (Many Files)
RCLONE
For many files that do not benefit from large parallelism due to being smaller in size the best way to get the greatest overall throughput is to download many files at one time, RCLONE is great for this. This can be done via either the hosted Gateway MT or native methods. If you implement a native method you bypass our edge services which is the slightly more performant path. The commands below are agnostic to the method for which you implement RCLONE.
Resources
Depending on the integration method you will either have high or low computer utilization.
- Native
- This will be the fastest with adequate compute. Increase --transfers until you have reached your throughput goal or limit of acceptable compute.
- Hosted Gateway MT
- If you have lower compute capability this may be faster. It is worth testing both integration patterns and seeing what works best for you. Increase --transfers until you have reached your throughput goal.
Example Commands
The following command will download 10 files at the same time
rclone copy --progress --transfers 10 remote:bucket /tmp
Download Tuning HTTP - (Single File)
It is possible to distribute files via the Storj Linkshare Service. It is also possible to use a multi-connector download utility to significantly improve the transfer speeds. For our testing we used aria2c. This utility uses very little CPU and has a great effect between 4 and 8 connections. One connection in testing was between 18-20MB/s.
2 connections (29-35 MB/s)
aria2c -x2 “https://link.eu1.storjshare.io/raw/link/bucket/pathfile.zip”
4 connections (70-80 MB/s)
aria2c -x4 “https://link.eu1.storjshare.io/raw/link/bucket/pathfile.zip”
Tools
RCLONE - Rclone downloads
Uplink with download parallelism flag - Release v1.37.2 · storj/storj · GitHub
aria2 - Release aria2 1.36.0 · aria2/aria2 · GitHub